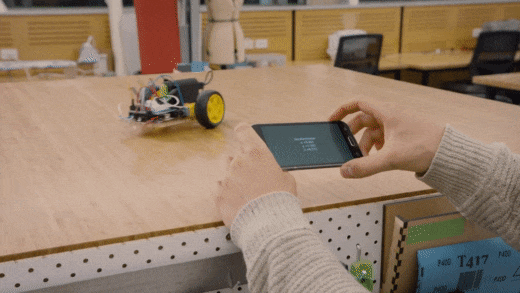
Remote Control Car
Overview:
This project makes use of an Arduino, a car chassis, a bluetooth module, and an android phone to make a Remote Control Car that is controlled by tilting the phone like a steering wheel. This post is a high level overview of the project and requires a solid understanding of coding.
Relevance to Design:
This project was created to test the communication capabilities between the android phone and custom hardware devices (in this case a car). In particular this project is interested in getting sensor information from the phone (the accelerometer) and translating it into an actualised output (The steering of a car). As android phones are ubiquitous and are capable of sensing a range of information, it is a useful skill for a design student to see how this information might be collected and used in devices they might design.
Design Process:
A project like this has many steps, I used a process of computational thinking to break down the project into bite sized chunks. An example of such chunks is as follows:
- Test reading accelerometer information from the android device
- Establish communication between Arduino and processing
- Send accelerometer information to Arduino
- Translate accelerometer information to a output to drive the motor
Technical overview:
This project is split into three main parts:
- Wiring the circuit diagram and building car
- Creating the android app in Processing to send the tilt information
- writing the code for the Arduino microcontroller in the car to receive the tilt information and translate into a motor output
Wiring the circuit diagram and building car
You can download the chassis to be laser cut or printed here: /https://www.thingiverse.com/thing:2586084
for the wiring please look at the following diagram made in fritzing 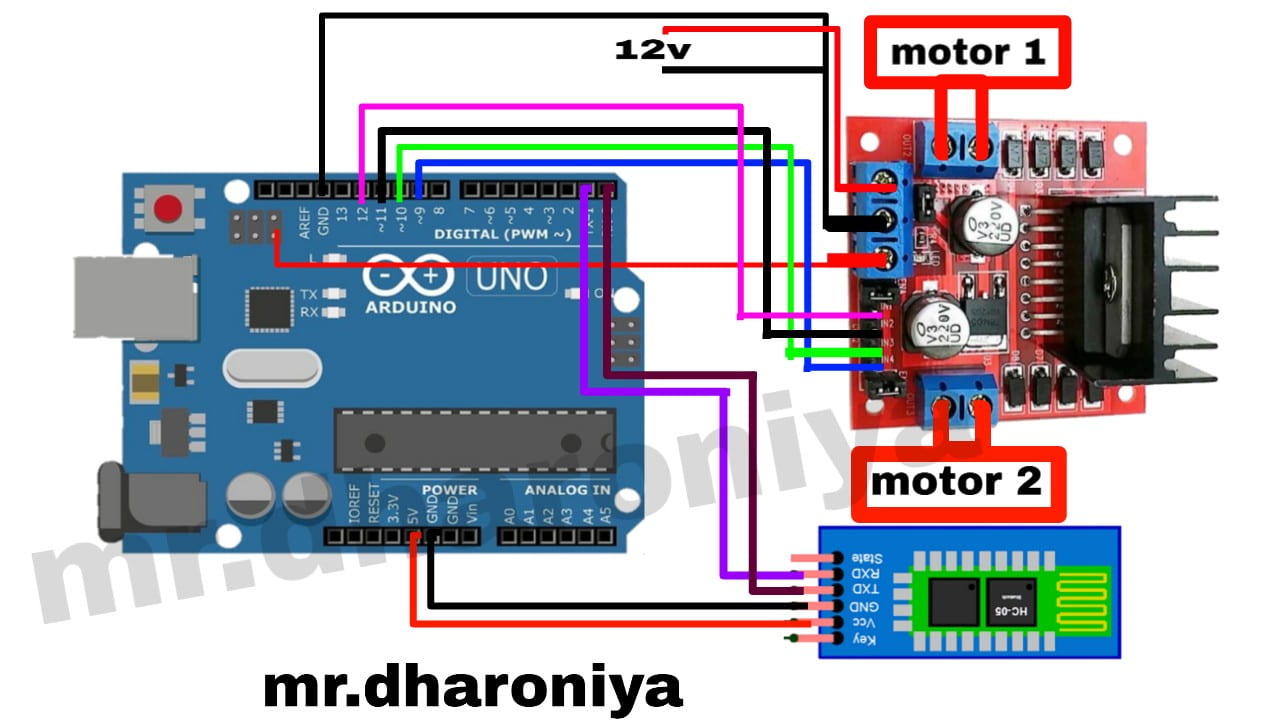
Creating the android app in Processing:
I used the ketai library for android processing. I combined the example scripts for the accelerometer and Bluetooth connection to create my own processing script:
// Sensor decliartions
KetaiSensor sensor;
float accelerometerX, accelerometerY, accelerometerZ;

PFont fontMy;
boolean bReleased = true; //no permament sending when finger is tap
KetaiBluetooth bt;
boolean isConfiguring = true;
String info = "";
KetaiList klist;
ArrayList devicesDiscovered = new ArrayList();

//********************************************************************
// The following code is required to enable bluetooth at startup.
//********************************************************************

void onCreate(Bundle savedInstanceState) {
super.onCreate(savedInstanceState);
bt = new KetaiBluetooth(this);
getActivity().getWindow().addFlags(WindowManager.LayoutParams.FLAG_KEEP_SCREEN_ON);
}

void onActivityResult(int requestCode, int resultCode, Intent data) {
bt.onActivityResult(requestCode, resultCode, data);

}

void setup() {
size(displayWidth, displayHeight);
sensor = new KetaiSensor(this);
sensor.start();
orientation(LANDSCAPE);
textAlign(CENTER, CENTER);
textSize(36);


//start listening for BT connections
bt.start();
//at app start select device…
isConfiguring = true;
//font size
fontMy = createFont("SansSerif", 40);
textFont(fontMy);
}

void draw() {
//at app start select device
if (isConfiguring)
{
ArrayList names;
background(78, 93, 75);
klist = new KetaiList(this, bt.getPairedDeviceNames());
isConfiguring = false;
}
else
{


background(78, 93, 75);
text("Accelerometer: \n" +
"x: " + nfp(accelerometerX, 1, 3) + "\n" +
"y: " + nfp(accelerometerY, 1, 3) + "\n" +
"z: " + nfp(accelerometerZ, 1, 3), 0, 0, width, height);


String s = "<" + int(((accelerometerX+10)*25.5)) + "," + int(((accelerometerY+10)*25.5)) + ">";
char[] a = s.toCharArray();
byte[] b = byte(a);
bt.broadcast(b);

}
}

void onKetaiListSelection(KetaiList klist) {
String selection = klist.getSelection();
bt.connectToDeviceByName(selection);
//dispose of list for now
klist = null;
}

//Call back method to manage data received
void onBluetoothDataEvent(String who, byte[] data) {
if (isConfiguring)
return;
//received
info += new String(data);
//clean if string to long
if(info.length() > 150)
info = "";
}

void onAccelerometerEvent(float x, float y, float z)
{
accelerometerX = x;
accelerometerY = y;
accelerometerZ = z;
}
// Arduino+Bluetooth+Processing
// Arduino-Android Bluetooth communication
code for the arduino microcontroller
Reliably reading in the data coming from the android phone was the most difficult part of this project. This blog post taught me everything I needed to know and reading serial data and it what my code is based on. My Arduino code is as follows:
#include <SoftwareSerial.h>

SoftwareSerial hc06(2,3);
String data = "";


// Example 5 - Receive with start- and end-markers combined with parsing

const byte numChars = 32;
char receivedChars[numChars];
char tempChars[numChars];        // temporary array for use when parsing

      // variables to hold the parsed data
char messageFromPC[numChars] = {0};
int x = 0;
int y = 0;
int z = 0;
int motorSpeed;
int left;
int right;
int dir;

int IN1 = 10;
int IN2 = 11;
int IN3 = 9;
int IN4 = 6;

boolean newData = false;

//============

void setup() {
    Serial.begin(9600);

      //Initialize Bluetooth Serial Port
  hc06.begin(9600);

  pinMode(IN1, OUTPUT);
  pinMode(IN2, OUTPUT);
  pinMode(IN3, OUTPUT);
  pinMode(IN4, OUTPUT);
}

//============

void loop() {
showParsedData();
    recvWithStartEndMarkers();
    if (newData == true) {
        strcpy(tempChars, receivedChars);
            // this temporary copy is necessary to protect the original data
            //   because strtok() used in parseData() replaces the commas with \0
        parseData();
        ControlCar();
        newData = false;
    }

}

//============

void recvWithStartEndMarkers() {
    static boolean recvInProgress = false;
    static byte ndx = 0;
    char startMarker = '<';
    char endMarker = '>';
    char rc;

    while (hc06.available() > 0 && newData == false) {
        rc = hc06.read();

        if (recvInProgress == true) {
            if (rc != endMarker) {
                receivedChars[ndx] = rc;
                ndx++;
                if (ndx >= numChars) {
                    ndx = numChars - 1;
                }
            }
            else {
                receivedChars[ndx] = '\0'; // terminate the string
                recvInProgress = false;
                ndx = 0;
                newData = true;
            }
        }

        else if (rc == startMarker) {
            recvInProgress = true;
        }
    }

}

//============

void parseData() {      // split the data into its parts

    char * strtokIndx; // this is used by strtok() as an index

    strtokIndx = strtok(tempChars,",");      // get the first part - the string
    x = atoi(strtokIndx);     // convert this part to an integer

    strtokIndx = strtok(NULL, ","); // this continues where the previous call left off
    y = atoi(strtokIndx);     // convert this part to an integer


}

//============

void showParsedData() {
//    Serial.print("Z ");
//    Serial.println(z);
    Serial.print("X ");
    Serial.println(x);
    Serial.print("Y ");
    Serial.println(y);
}

void ControlCar(){

 dir = map(y,-100,650,-255,255);
//  Serial.print("motorSpeed");
// Serial.println(motorSpeed);
//Serial.print("dir");
//Serial.println(dir);

  if (x < 258){
    //move foward
    motorSpeed = map(x,257,0,1,255); // 1-255 foward
    rightFoward();
    leftFoward();
    }else{
     //move back
    motorSpeed = map(x,258,550,1,255); // 1-255 backwards

    rightBack();
    leftBack();


}

  }

void leftFoward()
{
  analogWrite(IN1, constrain(motorSpeed - dir,1,255));
  digitalWrite(IN2, LOW);
//  Serial.print("left Foward");
//  Serial.println(constrain(motorSpeed - dir,1,255));

}

void rightFoward()
{
  analogWrite(IN3, constrain(motorSpeed + dir,1,255));
  digitalWrite(IN4, LOW);
//  Serial.print("right Foward");
//  Serial.println(constrain(motorSpeed + dir,1,255));
}

void leftBack()
{
  analogWrite(IN2, constrain(motorSpeed - dir,1,255));
  digitalWrite(IN1, LOW);
 // Serial.print("left back");
 // Serial.println(constrain(motorSpeed - dir,1,255));
}

void rightBack()
{
  analogWrite(IN4, constrain(motorSpeed + dir,1,255));
  digitalWrite(IN3, LOW);
//  Serial.print("right back");
//  Serial.println(constrain(motorSpeed + dir,1,255));
}

void stopMotors()
{
 digitalWrite(IN1, LOW);
 digitalWrite(IN2, LOW);
 digitalWrite(IN3, LOW);
 digitalWrite(IN4, LOW);
}


Hi
I am looking for hands on help to code and run a number of stepper motors using arduino. My project includes 10 sound sculptures which are now built and are at the coding stage .
Hi, We only help students from the Design degree at the University of Auckland sorry.
All the best.