Overview
For this project, we attempted to interface hardware sensors with Unity to manipulate virtual objects and give feedback to hardware.
Goals for this project; To use a sensor to control the camera position in a basic Unity 3D scene, and to turn on and off a LED, based on keyboard inputs.
This is based off a YouTube tutorial by inScope Studios.
Files used are available at the end of this post.
Unity and Visual Studio setup
First off, Unity and Microsoft Visual Studio will need to be installed. Follow the instructions from this link. This will guide you through installing the Unity Hub, the latest stable Unity build and Visual Studio. If there are any issues with Visual Studio IntelliSense auto-complete, recheck these steps were correctly followed. A valid unity licence is also required. Student licences are available for free by registering and verifying an xxx@aucklanduni.ac.nz email address to github account. See here for more information.
Arduino Hardware
Arduino hardware is usually relatively simple. In this case, there is only one sensor, four jumper wires and a USB cable.
The sensor is a VL53LOX, which is a time of flight sensor. It measures the time it takes a laser pulse to get to get transmitted out reflect off an object and get back to the sensor in the chip. These modules are about $5 from Aliexpress and can measure about 30mm – 6000mm.
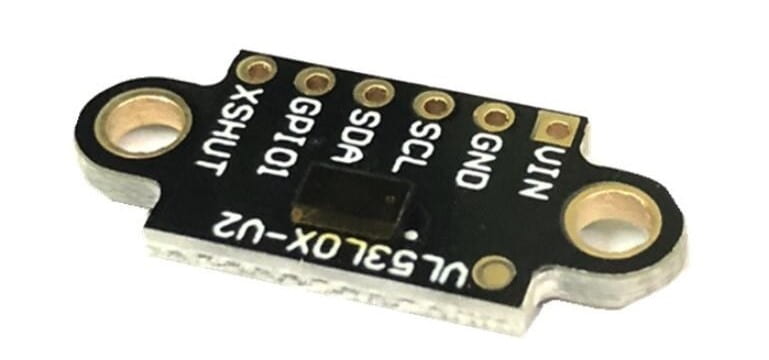
The distance sensor module value is acquired via the i2C serial bus which has three connections SDA (serial data), SCL (serial clock) and GND (ground or 0V). The module also requires power which is 3.3V to 5V on the VIN/VCC connection.
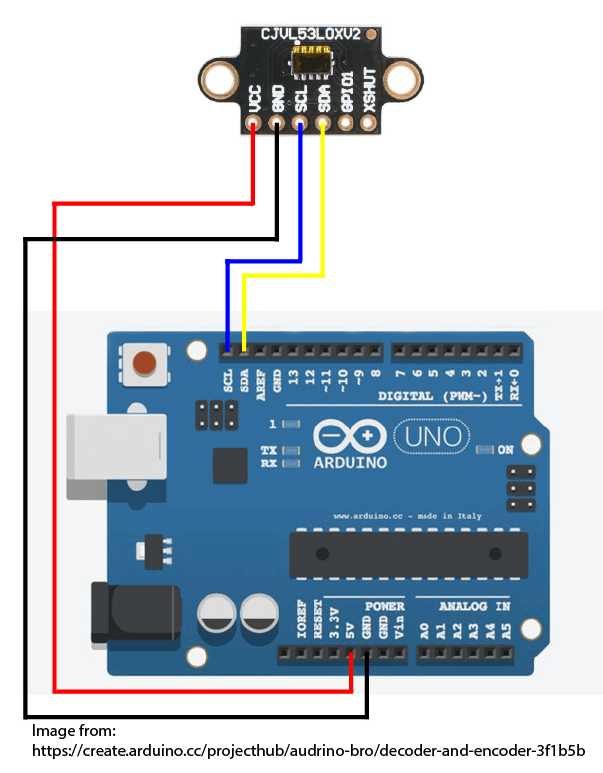
The module is connected (with jumper leads) to the Arduino’s SDA, SCL, 5V and GND pins as shown in the diagram below.
Arduino Code
The code utilizes serial port basics of send and receive via the Arduinos onboard USB to serial interface.
A basic overview of the workflow is as follows:
- Code objects and hardware initialized.
- The main code loop is started.
- Input commands are checked and applied if available.
- Sensor values are measured and stored.
- Sensor values are sent via serial port
- Loop waits a small amount of time before cycling again
/*
 * Unity integration example project
 * Outputs sensor data and receives command data via Serial port
 *
 * By Jamie C from designtech@auckland.ac.nz
*/
#include "Adafruit_VL53L0X.h"   // Include the library for the distance sensor

const int ledPin = LED_BUILTIN;
int ledState = 0;

Adafruit_VL53L0X lox = Adafruit_VL53L0X();  // Create a new instance of the library object to use later called "lox"

void setup() {
  pinMode(ledPin, OUTPUT);    // Setup the LED pin as an output
  digitalWrite(ledPin, LOW);  // Initially set the LED pin as LOW / OFF

  Serial.begin(115200);   // Start the serial connection at a baud rate of 115200 bits per second

  // wait until serial port opens before continuing (for native USB devices)
  while (! Serial) {
    delay(1);
  }

  // If can't connect to the VL53LOX, write an error comment to the serial port
  if (!lox.begin()) {
    Serial.println(F("Error: Failed to boot VL53L0X"));
    //while(1);
  }
}

void loop() {

  ledState = recvSerial();  // Check if any serial commands have been received and set the ledState vairable to what was revieved
  // depending what is received, turn the led ON or OFF
  if (ledState == 1)
  {
    digitalWrite(ledPin, HIGH);
  }
  else if (ledState == 0)
  {
    digitalWrite(ledPin, LOW);
  }

  VL53L0X_RangingMeasurementData_t measure;   // create a new measurement vairable called measure
  //  Pass the measure vairable to the lox object to preform the rangingTest funchion
  lox.rangingTest(&measure, false); // pass in 'true' to get debug data printout!

  if (measure.RangeStatus != 4) {  // phase failures have incorrect data
    Serial.println(measure.RangeMilliMeter);  // output the measurement value in millimeters
  } else {
    Serial.println(0x00);   // else output 0
  }
  delay(100);   // wait 1/10th of a second to give unity a bit of time to work with the data
}

// The received serial function
int recvSerial() {
  if (Serial.available()) {
    int serialData = Serial.read();
    switch (serialData) {
      case '1':
        return 1;
        break;
      case '0':
        return 0;
        break;
      default:
        return -1;
    }
  }
}
Unity scripts
Unity objects can have components assigned to them. These can be pre-completed assets from the project asset folder or new components. These include scripts written in C# (CS or C Sharp). Assets can be added to components simply by dragging them onto them or created from scratch by clicking the component and adding a new component under the inspector tab.
The script has two major sections.
The Start function which is only run at when the script is activated and the Update function which is run by unity at intervals during the application.
The script
Basic workflow:
- Initiate the applicable libraries, specifically the “System.IO.Ports” for serial port use
- Create public variables (these can be accessed and changed from the inspector tab in Unity)
- Create a new Serial port object “sp”
- Start: Try to open the serial port. If it throws an error it will be caught in the catch function
- Update: Read the line from the serial port and format the value it correctly
- Calculate the required movement based on the data input
- Move the attached Unity object the calculated amount. This uses the transform.Translate Unity function
- Use the ‘Input.Getkeyup’ function from unity to get what keyboard keys were released then send the value through the serial port
Note: This example was created in a 3D scene so the ‘transform.Translate’ function needs to have the 3D argument of ‘Vector3’. This made the complete movement call “transform.Translate(Vector3.left * [move amount], Space.World)” where the second argument of ‘Space.World’ is where the Unity object moves in reference too.
using System.Collections;
using System.Collections.Generic;
using UnityEngine;
using System;
using System.IO.Ports;

public class SerialLaser : MonoBehaviour
{
// Gloal vairables selectable from Unity
public string Com_Port = "COM6";
public int Baud_Rate = 115200;

// Global parameter values
public int devVal = 10;
public int setPoint = 175;
public int maxAcc = 25;
public int accZone = 100;

SerialPort sp = new SerialPort();

// Start is called before the first frame update
void Start()
{

try
{
sp.BaudRate = Baud_Rate;
sp.PortName = Com_Port;
sp.ReadTimeout = 1;

sp.Open();
}
catch
{

Debug.Log("Serial port error!");
}
}

// Update is called once per frame
void Update()
{
try
{
string readInput = sp.ReadLine();
readInput = readInput.Replace("\r", "");

int readVal = Convert.ToInt32(readInput);

calculateMovement(readVal);

// Keyboard outputs to hardware
if (sp.IsOpen)
{
// reads both the numbers above the keys or numberpad
if (Input.GetKeyUp("1") || Input.GetKeyUp("[1]"))
{
sp.Write("1");
Debug.Log(1);
}
else if (Input.GetKeyUp("0") || Input.GetKeyUp("[0]"))
{
sp.Write("0");
Debug.Log(0);
}
}
}
catch
{

}

}

void calculateMovement(int input)
{
if (input > 0)
{
// get the raw acc value in respect to the setpoint
float accVal = input - setPoint;

decimal accelerationTmp = 0;

decimal multiplyer = 0.00M;
multiplyer = Decimal.Divide(maxAcc, accZone);

//calculate the acceleration
if (accVal > 0 && accVal > devVal) // if positive and outside noise level
{
// offset the acc val to start at 0
accVal = accVal - devVal;

// map the value to the range
accelerationTmp = (decimal)accVal * multiplyer;

// constrain output to limits
if (accelerationTmp > maxAcc) accelerationTmp = maxAcc;

//moveLeft((int)accelerationTmp);
moveBackward((int)accelerationTmp);
}
else if (accVal < 0 && accVal < -devVal) // if negative and outside noise level
{
// offset the acc val to start at 0
accVal = accVal + devVal;

// map the value to the range
accelerationTmp = -(decimal)accVal * multiplyer;

// constrain output to limits
if (accelerationTmp > maxAcc) accelerationTmp = maxAcc;

//moveRight((int)accelerationTmp);
moveForward((int)accelerationTmp);
}
}
else
{
// Set outputs to 0
}
}

void moveLeft(int moveVal)
{
transform.Translate(Vector3.left * moveVal, Space.World);
}
void moveRight(int moveVal)
{
transform.Translate(Vector3.right * moveVal, Space.World);
}
void moveForward(int moveVal)
{
transform.Translate(Vector3.forward * moveVal, Space.World);
}
void moveBackward(int moveVal)
{
transform.Translate(Vector3.back * moveVal, Space.World);
}
}
Project files
Unity Sensor intergration files
Future changes
- Use background workers for both input and outputs as ‘keyup’ functions can have a long delay contending with the rest of the code.
- Have unity call for data which the Arduino then sends. This will also speed up the code, help the key functions and reduce serial port waste